Last updated: 3rd December 2024
Retuning the horn button
Undertaking a 'February Fettle' checking all the usual suspects: top up the oils, lube the distributor, check the plugs and points, plus a once over of other bits and bobs. All was well until I got to the horn. No noise, not a toot.
Now, I have had horn problems before. The contacts tend to get manky through lack of use, so a quick brush up seemed to be in order.
Whipping the back cover off, I got busy with the fine paper. Having polished up the contacts, a stab on the horn button gave….nothing. A glance at the ammeter failed to give that tell tale flick of current, so it was clear that the contacts weren’t closing.
A quick squint (and I mean that!) showed a few thou of clear daylight between the points, so the circuit wasn’t being closed. Not only that, but the points when pushed together met at the edge, not nicely flat on the faces. Looks like the clean up has been a little enthusiastic.
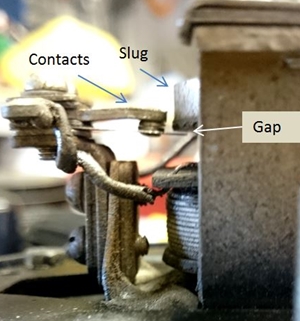
By removing the horn to the bench, I was able to get a closer look.
Taking out the two screws in the contact pack, being careful to keep the
insulated bushes and spacers in the right order, it was the work of
moments to gently reform the spring on the moving contact, such that on
reassembly it slapped the stationary contact squarely on the face.
Lovely. Before refitting the horn, I applied a bit of 6V, and the
steel slug of the solenoid was pulled in towards the coil on the horn
assembly. Unfortunately, it just hung there when the power was
applied. On close inspection, I could see that although the
contacts were now closing, they weren’t being opened again by the rubber
ring on the slug. (See pic 1). It’s not possible to simply move the
slug down the horn actuating pin: it’s held in compression up against
the strip springs.
The slug should be slightly spaced off from the rectangular spring, so that when energised, the rubber hits the moving contact and opens it.
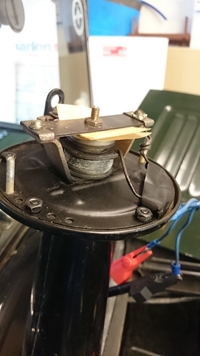
I needed was some shim material being quite thin but capable of being
stacked in multiple layers, so that the slug is spaced off the spring by
just a few thou. The shim needs to be easy to manage, oil proof,
damp proof and resistant to the heat in the engine bay. In the kitchen
we had the perfect material - baking parchment! Half a dozen
thicknesses were cut into a disc about 25mm dia. with a hole in the
middle, and trapped between the slug and the rectangular spring. (Pic 2)
Now when power was applied, the slug moved towards the coil, smacked the moving contact to open it and the resonance in the spring caused the whole thing to bounce up and down like a sugar fuelled toddler on a trampoline.
At this stage I had a horn that buzzed like an angry hornet, but didn’t “parp”. All this fiddling had put it out of adjustment. So, taking a leaf from Ozzy Osbourne’s autobiography, (the Black Sabbath front man’s first job after leaving school was as a horn tuner for Lucas in Birmingham), the threaded rod was gently wound in a quarter turn at a time until the end hammered on the diaphragm in the horn. Now I have a proper Parp. The locknut, slug and threaded pin are nipped up to prevent them moving, and the cover refitted. Job’s a good’un.
This article, written by Geoff Hardman, originally appeared in CA7C Seven Focus in May 2017 pp 20-22.