Last updated: 3rd December 2024
Clutch Pedal Adjustment
During a recent engine change over, the I had the problem of fixing the clutch pedal in place and getting rid of any free play.
I am using the following terminology :–
The two levers on the Clutch Lever Spindle I am calling 'Clutch
Fingers',
The three levers on the Clutch itself I am calling the 'Clutch Levers'
I am also using terminology from the Austin 7 Spares list 1029A, 1933,
pages 33 – 34. A copy can be viewed on the A7CA's web site.
_1.jpg)
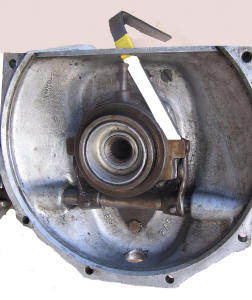
What
exactly are we trying to do? Photo. left - Play shows the two
spindle mounted Clutch Fingers in free space between the back of the
housing and the Clutch Withdrawal Collar at (‘A’), we want to eliminate
that – stop any rattling - we are also attempting to compress the Clutch
Thrust Bearing Spring and bring the Clutch Thrust Bearing (‘B’) closer
to the Clutch (Withdrawal Plate) Levers, without actually touching them.
_1.jpg) Austin’s
put a slot in the end of the spindle (Photo right) to enable a very short,
but broad bladed screwdriver or similar to go in there to help twist the
Spindle whilst tightening up the clutch pedal clamp bolt from under the
car. I wonder who's bright idea that was, it certainly did not work for
me, there was no room, let alone seeing what I was doing under there
(plus bifocal’s focusing in the wrong place).
Austin’s
put a slot in the end of the spindle (Photo right) to enable a very short,
but broad bladed screwdriver or similar to go in there to help twist the
Spindle whilst tightening up the clutch pedal clamp bolt from under the
car. I wonder who's bright idea that was, it certainly did not work for
me, there was no room, let alone seeing what I was doing under there
(plus bifocal’s focusing in the wrong place).
I looked in Doug Woodrow’s Manual and other booklets etc., to find a method, zilch! There
are hint’s in the 750MC’s ‘Companion’ of magazine extracts, one of which
dates from 1959, but there’s nothing explicit, nothing to help Joe
Bloggs.
During a chat with fellow member Andrew Jarmin, this topic came up and Andrew very
kindly sent me a drawing of 'The Tool' he has created to make clutch pedal
adjustment etc., simple. I bought some steel, 14 x 3 mm bar,
chamfered one end to something like a chisel point and on a spare
gearbox I tried to work out how Andrew's item would work. At this point
I ignored all the good advice and went off at a tangent creating a major
surgery method, rather than Andrew’s ‘Keyhole’ process – I should have
read the instructions! I did put a piece of yellow tape at the
point the lever has gone down the right distance into the Clutch area –
and it’s gentle on the gearbox’s metal edge, this is approx. 4.5 inches
(115mm)
from the chisel point to the centre of the yellow tape. The tool is not
white, this is for photo legibility.
So, nip up the Pinch Bolt on the Clutch Pedal Lever Arm (from under the
car) so that it just grips the Clutch Lever Spindle.
Then inside the car, lightly push the Clutch Pedal down so that the
Thrust Bearing Oiler has moved towards the engine, clearing the Oiler
Hole and the Thrust bearing itself contacts the Clutch Levers as shown
in the last photo but without ‘The Tool’, yet.
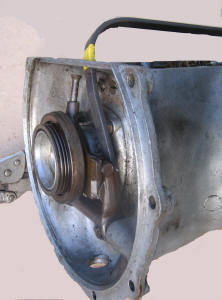
Insert ‘The Tool’ into the Clutch Oiling Hole in the top of the gear
box moulding at about 60 degrees as shown in photo left, fiddle with the end of
the lever until it is trapped behind the Operating Arms on the clutch
shaft - the Clutch Pedal will not then be able to move back freely, and
then push until you feel the Clutch Thrust Bearing is onto the clutch
levers, it’s then a lot firmer to push, let the Clutch pedal come back a
shade.
Under
the car, and release the Pinch Bolt on the Clutch Spindle Shaft and push
the Clutch Pedal Lever Arm back to where you want it to be (normally as
far away from the engine as possible so there's no slack), tighten the
Pinch Bolt up on the Clutch Pedal Lever Arm as very tight as possible.
Job done, and I’ve ditched my major surgery idea. That’s my
trouble, the ‘Black Hand Gang’ know what they are doing, unfortunately I
joined the ‘Cack Handed Gang’.
NB: The 'Black Hand Gang' are our group of experts who always seem to have oil on their hands.
This article, written by Sandy Croall, originally appeared in CA7C Seven Focus, May 2012 pp24-26.
See also:
Clutch Pedal Adjustment - a modification
Clutch - Keeping Friction Surfaces Dry