Home
Page
welcome to our website
About Us
information about our Club
Contacts
our Officers and Committee
Events Diary
our events for the
months ahead
Event Reports
from the last four months
Member's Cars
a selection of
our active "Sevens"
Joys of being a 7'er
and a few stories
Do you fancy an Austin Seven?
advice on buying a "Seven"
Photo Gallery
of our past activities and
"Sevens" in close up
From the Past
Items from 1920/30s
magazines
Registration Marks
in the UK from 1903
Help at the roadside
fuel and electrical problems
Austin Seven Journal
advice for Austin Agents
& Service Depots
Austin Seven
Handbooks
information for the
new owner
Technical Articles
our Members help you
with various tasks
Austin Big Seven
Sixlite & Forlite
Magazine Articles
relevant to Sevens
Road Tests
for the most popular "Sevens"
Parts and Services
sources of spares etc
Quick Tips
a few handy ideas
Other Articles
of interest, not technical
Austin Seven Books
some of the books available
A7CA and FBHVC
CA7C is an active supporter
Links to other Austin
Seven Sites
Website Policy
on advertisements and links
Last updated:
23 September, 2023
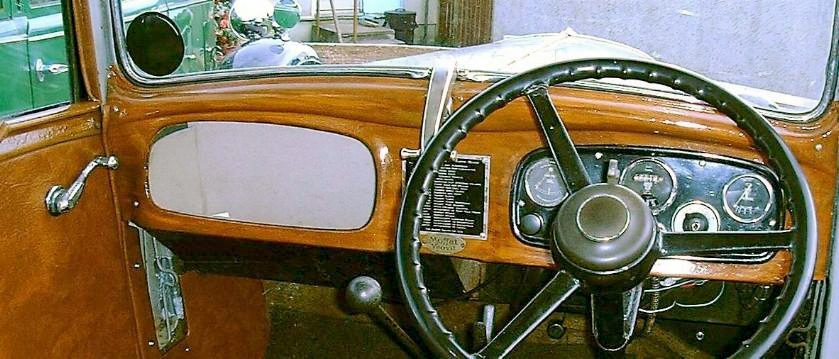
Wood grain dashboard
for a 1935 Ruby
Dashboards on the early Ruby was done in a very attractive wood grain effect. As far as I am aware there is no replacement surface to achieve the effect without physically painting the dashboard.

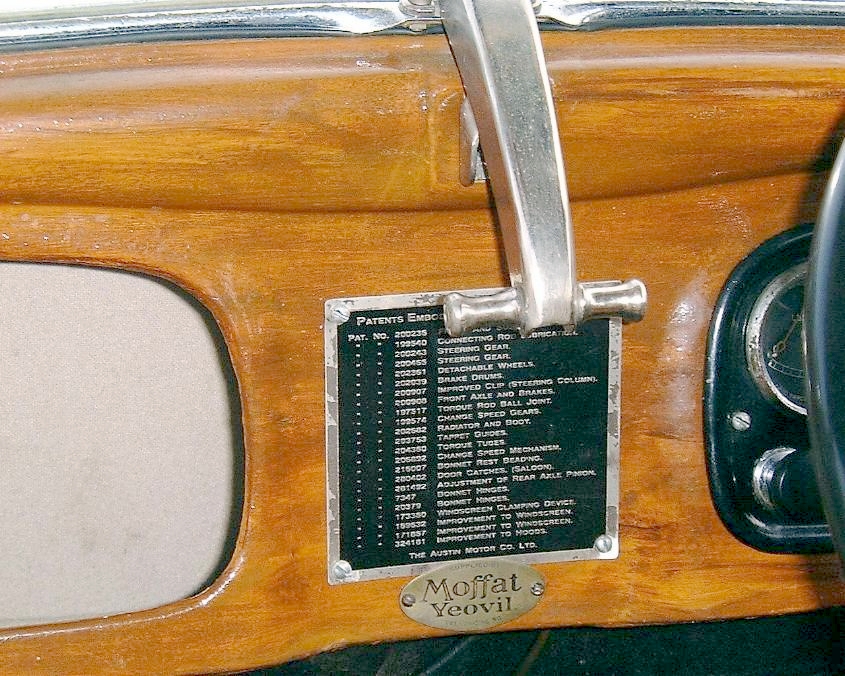
When I stripped down the dashboard from my 1935 Ruby I found a small
area of original wood grain effect under the patent plate so I decided
to reproduce this as close as possible. I photographed the only
remaining piece of wood grain and kept it for a reference.
Materials & Tools
Artist's Acrylic paints (the heavy body type in tubes) Raw Sienna (or Yellow Ochre), Burnt Sienna, Raw Umber, Black and White
A medium sized soft brush (a cheap size 8 or 10)
A flat stiff hogs oil painting hair bristle brush size 6 or 8.A spray can of car body clear lacquer.
You will also need some household items like an old tooth brush, coarse sponge and a comb.
The colour of the paints required depend on the wood being imitated. I understand that there were two shades of wood grain, one very dark like a dark oak and the lighter almost teak colour.
Method
Before you start on the real thing, practice on a spare piece
of metal. You will learn a lot and be able to discover your way of doing it.
There is no correct way, only the way that suits you.
I will now describe how to achieve a Teak effect, the methods are the same for all wood effects only the colours will need to be changed.
To start, after having prepared the metal dashboard to a normal standard ready for painting, you first have to paint the dash with a base colour which is similar to your desired effect. Before choosing the colour make sure you read all the article as you should gain an insight as to the purpose of the base colour. For my example I used a Red-Brown colour. You can either use car body spray paints or the Acrylic paints directly. If you use the Acrylic paints make sure you brush them in the grain direction only.
Select the Acrylic colours which appear in the wood being imitated, I selected Raw Sienna, Raw Umber, White and Black. If you look closely at a sample of the wood you are copying you will see more colours than a simple 'brown', hence the use of Black and White. Some woods may even need a yellow or red. Place a little of each colour onto a white plate, saucer or tray.
Start with the predominate colour (Raw Sienna) and using the stiff brush, paint a thin layer onto the panel with brush strokes following the grain direction.
Leave streaks of the base colour showing through. Only paint about 3 or 4 inches along the panel you are painting While the paint is still wet (it will dry in about 3 to 5 minutes) pick up a small amount of the next predominate colour (Raw Umber) and blend into the first in streaks, you may find the stiffer brush helpful. Now paint the next 3 or 4 inches in the first colour and repeat the second colour, make sure that each section of painting along the panel is well blended with the previous section.
When you have completed the panel with the first colours now is the time to play with the paints. The idea is to take a very small amount of paint (in my example the white and black) and using as coarse a brush as possible (the toothbrush or comb or anything else of a similar nature you can find at home) drag the almost dry brush across the surface that you have painted, in the direction of the grain and it should leave fine lines like grain on the surface. Keep doing this all over the panel, it is best to work all over the panel with each colour rather than working in one area at a time. When you have the desired wood grain effect then the panel is finished of with several light coats of Car Lacquer spray (intended for top coating metallic paint finish).
Where you need other effects like Knots or Burr effect then you need to experiment with tools and methods. For example Burr Walnut can be achieved by painting the lighter colour first then thinning down the dark colour with water and applying it with a just damp sponge and soft brush. Dab the sponge to give a mottled effect and then drag the soft brush in and around the sponged area to produce connecting grain, If the paint is thin enough some of the lighter under layer will show through to varying degrees.
Light and dark veining is produced by undercoating with the first layers using two colours side by side partially blended together.
It is a lot easier to do than to describe, use a little imagination and if possible obtain an example or a picture of the wood to be copied but don't try and make an exact copy of the example. Do a little at a time but be bold and free with your brush strokes and always follow the direction of the grain. If all goes total wrong paint stripper will remove the Acrylic and start again, Remember, nothing ventured, nothing gained.

This article, written by Malcolm Watts, originally appeared in CA7C Seven Focus.
See also:
Glovebox Liner for Ruby